Salesforce provides administrators with control over the types of emails that can be sent from their environments, especially for sandboxes used for development and testing. These email deliverability settings ensure that sensitive or erroneous emails don’t get sent to actual users during development. Let’s dive into the details and the impact of each setting and Understanding Email Deliverability Settings in Salesforce.
Where to Find the Deliverability Settings:-

Note: If Salesforce has restricted your ability to change the setting, it may not be editable.
Access Levels for Email Deliverability has three key deliverability settings you can configure in Salesforce:
Prevents all outbound email except for password reset emails. This is the most restrictive setting, ensuring no outbound communication can be accidentally sent.
Example: This might be useful for sandboxes during sensitive phases of development where absolutely no external communication should occur.
Allows only system-generated emails such as password reset and new user welcome emails.
Example: When a developer creates a new user in the sandbox, the welcome email will be sent, but no other emails will be generated during testing, ensuring no business emails are mistakenly sent.
Allows all types of outbound email, including both system-generated and user-generated emails. This is the default setting for new production orgs and is suitable for active environments that communicate with end users.
Example: In a production environment, you’d want this setting enabled to allow business-related communication, such as customer support emails or automated marketing messages, to flow smoothly.
The System email only setting is particularly useful in sandbox environments. When testing workflows, triggers, and automation in a sandbox, it ensures that only system-critical emails (like password resets) are sent. This prevents development or test emails from accidentally reaching real users, preserving the integrity of your organisation’s communication strategy.
New Sandboxes Default to System Email Only.
With the introduction of Spring ’13, Salesforce made a significant change: New and Refreshed sandboxes now default to the System email only setting. This helps developers avoid accidental email blasts when testing in non-production environments. For sandboxes created prior to Spring ’13, the default setting remains All email, though it’s recommended to update this setting to prevent sending test emails.
Example: Use Case for Sandboxes
Imagine you’re working on a custom email alert in a sandbox environment for a large retail company. You want to test the email logic, but sending test emails to actual customers or employees would be problematic. With System email only activated, you can confidently run your tests without worrying about accidental emails being sent out.
When using Bounce Management in Salesforce, you gain valuable insights into email deliverability, especially for emails sent from Salesforce or via an email relay. Let’s break down the key aspects and best practices for managing bounced emails, ensuring your communication efforts remain effective.

If your organisation uses an Email Relay (where Salesforce sends emails via your own email server), make sure that your email server allows relaying of emails sent from Salesforce. This ensures that your email server successfully processes and delivers the emails and that bounces are properly reported back to Salesforce.
When an email sent to a contact, lead, or person account hard bounces (permanent failure), an alert icon appears next to the email address on the record’s detail page. However, this icon only appears for hard bounces. In the case of a soft bounce (temporary failure, like a full inbox), the icon will not be displayed.
Example:
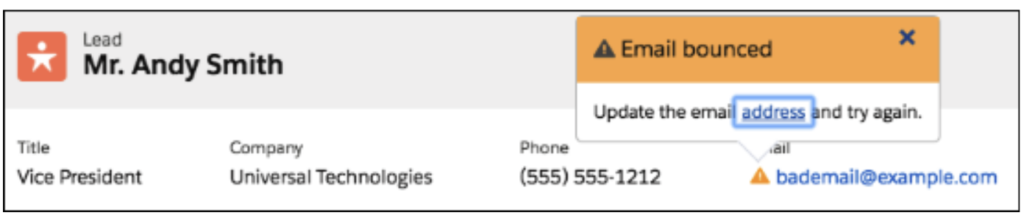
For instance, if Mr. Andy Smith, a lead has an email address that returns a hard bounce, you will see an alert icon next to his email (bademail@example.com) in his record details. This allows users to quickly identify the issue and update the email address. Until the email address is corrected or confirmed, other users won’t be able to send emails to that address.
It’s recommended to include the Email Address field in the highlights panel on the detail page of leads, contacts, or person accounts. This makes it easy for users to see the alert icon when a bounce occurs. Users are immediately informed that they need to update the email address before attempting further communication.
When emails bounce, the bounce notifications are sent back to Salesforce, not the sender’s personal email account. This centralised handling of bounces helps ensure that all email deliverability issues are managed within Salesforce, and bounce reports can be easily accessed.
Salesforce offers a standard report to help you monitor bounced emails. The Bounced Contacts and Bounced Leads report shows:
The associated contact, lead, or person account.
This report is a useful tool for managing and cleaning up your database by providing insights into which email addresses need attention or updating.
If you send an email campaign to a list of leads and 20 emails bounced, you can quickly pull the Bounced Leads report. The report will show which emails bounced, whether they were hard or soft bounces, and the reason for the bounce (e.g., invalid domain, non-existent email). You can then take action by reaching out to correct the email addresses or removing the bounced leads from future campaigns.
If the Standard Bounce reports are not available in your organisation or if you are using Lightning Experience (these report types are not yet available in Lightning), you can create Custom Reports using the fields ‘Email Bounced Reason’ and ‘Email Bounced Date’ which are already available in the standard Contact and Lead Report Types.
If you’re using the Lightning Experience Report Builder follow these steps to get the report:
1. Go to the Reports tab.
2. Click New Report.
3. Select ‘Accounts & Contacts’.
4. Select ‘Contacts & Accounts’ from the report type list, then click Continue.
5. Under ‘Contact: Ph/Fax/Email’, look for the ‘Bounced’ fields.
6. Add Email Bounced Reason and Email Bounced Date in the Report Preview.
7. Add a filter ‘Email Bounced Reason Not Equal to NULL’, then click Run Report.

Have you tried configuring the Email Deliverability Settings in Salesforce? Share your experience in the comments below! Thanks 🙂